Install the Deskbolt widget on your website
This page is the integration checklist for the Deskbolt AI chat widget. Anyone — your in-house dev, a freelance webmaster, or you with a copy/paste — can have the widget live on your website in under five minutes. No code review, no DNS change, no hosting setup.
The widget is a single <script> tag. Once it loads, the AI agent shows up in the corner of every page on your site and starts qualifying inbound leads in 159+ languages, 24/7.
Before you start
You need:
- An active Deskbolt agency account (provisioned by us when you signed up).
- Admin or Manager access to your dashboard. Agents do not see widget settings.
- The ability to add a
<script>tag to your website — either edit the HTML directly, or use whatever your CMS calls "custom code", "embed", "header/footer scripts", or "tracking codes".
That's it. You do not need to install anything, point a DNS, or expose an API key.
1. Find your Widget ID
Every Deskbolt widget has a unique identifier — your Widget ID. It's what tells our servers which agency, which AI agent, and which branding to load.
To find it, log into your dashboard at www.deskbolt.com, then in the left sidebar go to Settings → Widget:
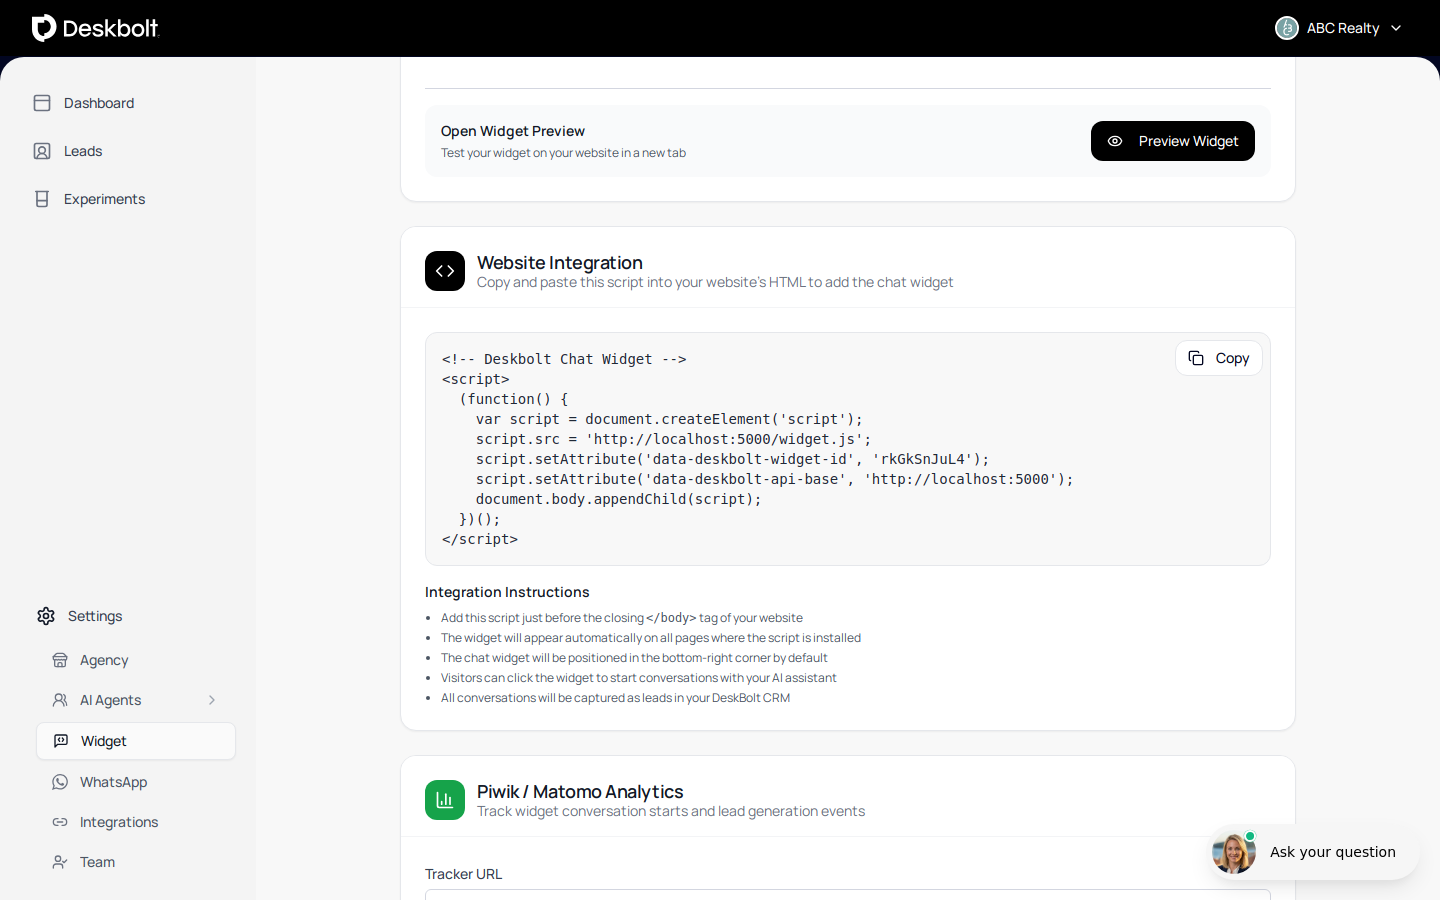
Scroll down until you see the Website Integration card. Your Widget ID and the full integration script are inside it:
You can run separate widgets on separate websites under the same Deskbolt agency — for example one widget on your main agency site, one on a single-property landing page. Each widget has its own ID, its own AI agent assignment, and its own styling. To create another widget, contact support@deskbolt.com — we'll provision it from your dashboard.
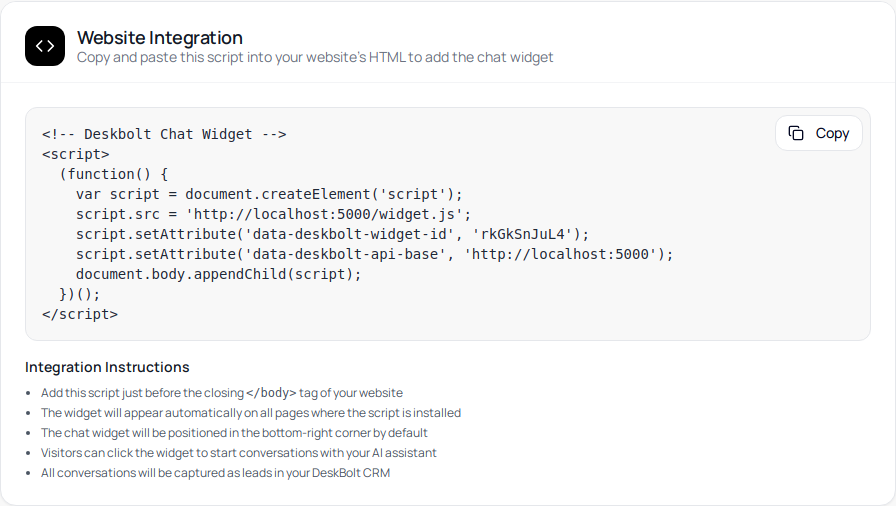
2. Copy the integration script
Click Copy in the Website Integration card. The clipboard now contains a self-injecting <script> block that looks like this:
<!-- Deskbolt Chat Widget -->
<script>
  (function() {
    var script = document.createElement('script');
    script.src = 'https://www.deskbolt.com/widget.js';
    script.setAttribute('data-deskbolt-widget-id', 'YOUR_WIDGET_ID');
    script.setAttribute('data-deskbolt-api-base', 'https://www.deskbolt.com');
    document.body.appendChild(script);
  })();
</script>
Where YOUR_WIDGET_ID is replaced with the value generated for your agency. Keep this snippet exactly as is — it is safe to expose publicly. The Widget ID is not a secret; it identifies your agency the way a Google Analytics tracking ID does.
If your CMS only accepts a plain <script src> tag (no inline JavaScript), this shorter form also works:
<script src="https://www.deskbolt.com/widget.js" data-deskbolt-widget-id="YOUR_WIDGET_ID"></script>
Both forms are equivalent. The longer copy/paste from the dashboard is just defensive — it works even when CMS's strip out scripts that aren't wrapped in a function.
3. Place the script on your website
The recommended location is just before the closing </body> tag. That way the widget loads asynchronously after the rest of your page, with zero impact on how fast your site appears for visitors.
<!DOCTYPE html>
<html>
  <head>
    <!-- your normal head content -->
  </head>
  <body>
    <!-- your normal page content -->

    <!-- Deskbolt Chat Widget -->
    <script src="https://www.deskbolt.com/widget.js" data-deskbolt-widget-id="YOUR_WIDGET_ID"></script>
  </body>
</html>
Placing it in <head> also works, but is not recommended — the script then loads earlier and can slightly slow down the first paint of the page on slow connections.
The widget snippet works on every page of your site. Add it once to your global template (header/footer file, layout component, theme include, GTM container, etc.) and the widget will appear site-wide.
4. Platform-specific guides
WordPress
The recommended way to install the widget on WordPress is the official Deskbolt plugin. No code, no theme edit, no third-party plugin to keep up to date.
Option 1 — Official Deskbolt plugin (recommended)
-
In your Deskbolt dashboard, go to Settings → Widget and scroll down to the WordPress Integration card.
-
Click Download Plugin (ZIP). You will receive a small
.zipfile. -
In your WordPress admin, go to Plugins → Add New → Upload Plugin.
-
Choose the ZIP you just downloaded and click Install Now, then Activate Plugin.
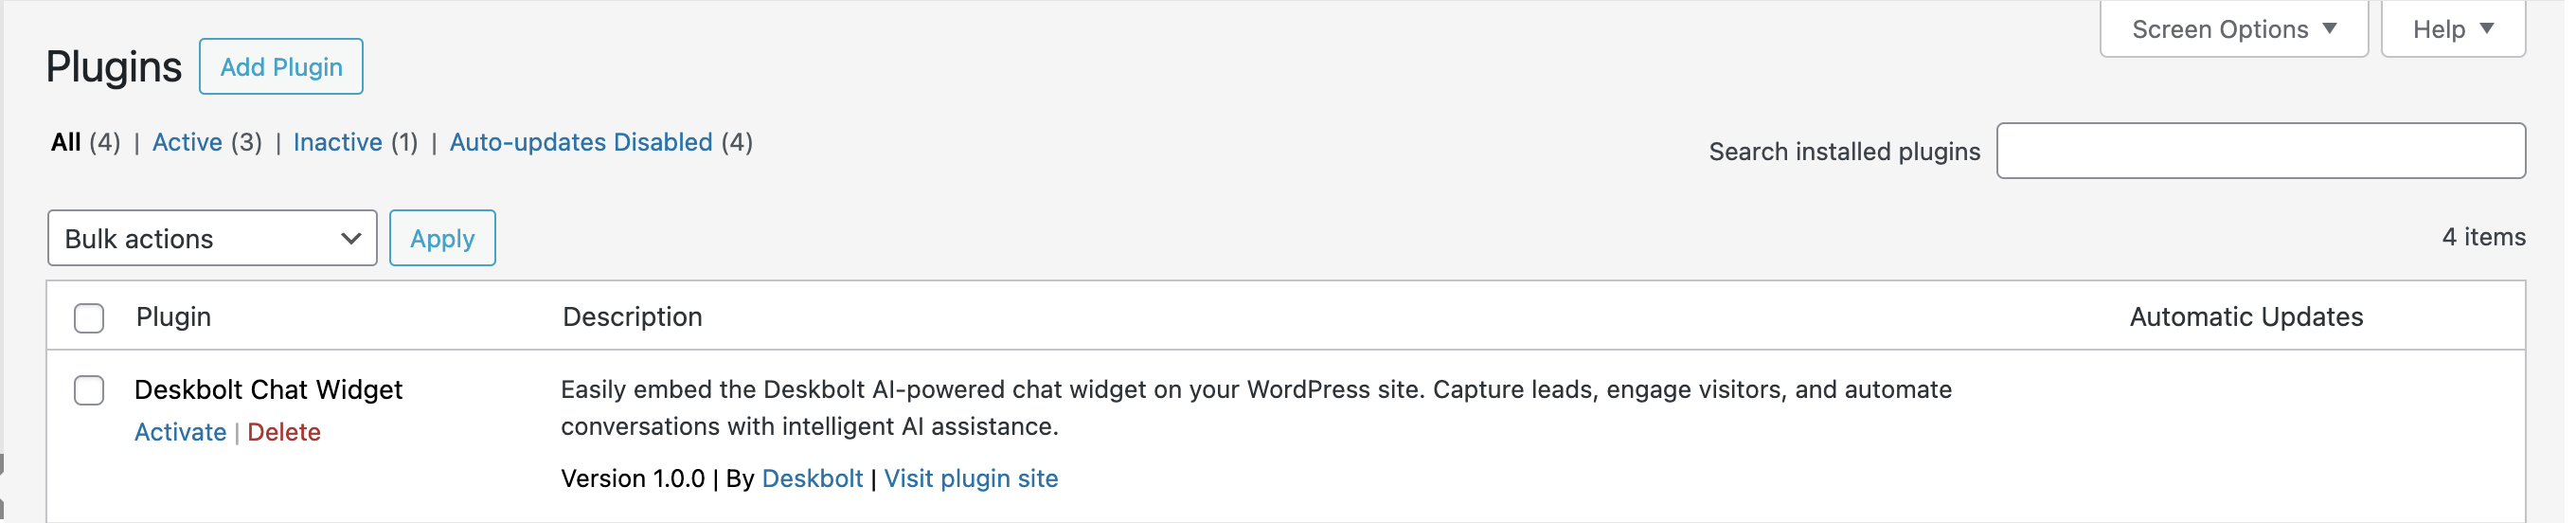
-
The plugin now appears in your installed plugins list:
-
In the WordPress sidebar, go to Settings → Deskbolt Widget:
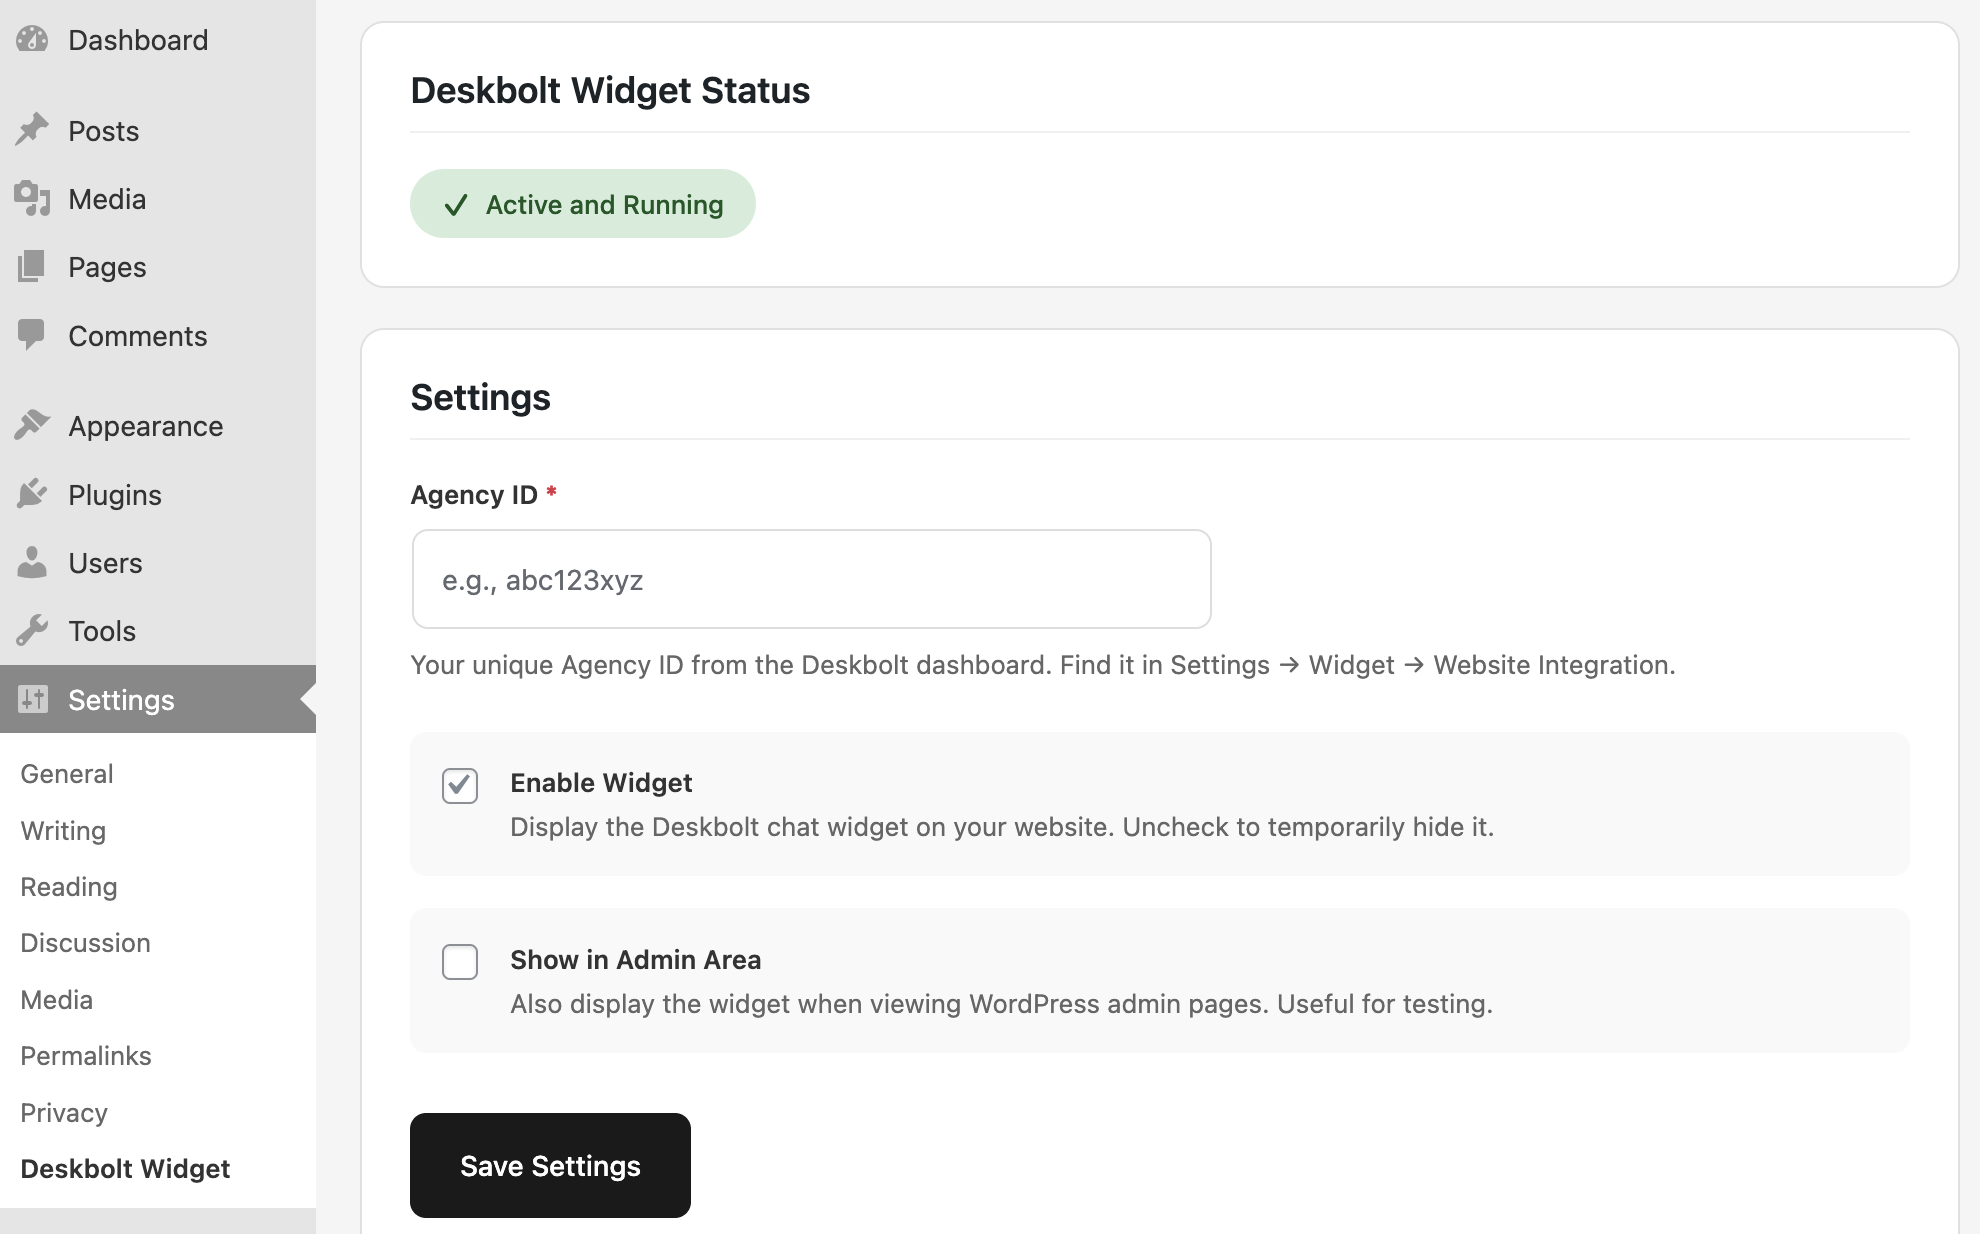
-
Paste your Agency ID (it's the same value as the Widget ID — copy it from your Deskbolt dashboard, Settings → Widget → Website Integration).
-
Make sure Enable Widget is checked, then click Save Settings.
The status badge at the top should switch to Active and Running, and the widget will appear on every page of your WordPress site within seconds. The optional Show in Admin Area toggle is useful if you want to test the widget directly from the WordPress admin without leaving the dashboard.
The plugin is signed and maintained by Deskbolt, follows WordPress security best practices, and updates from your dashboard whenever we ship a new version.
Option 2 — Manual install (no Deskbolt plugin)
If you prefer not to add a plugin, you have two manual paths:
- Header & footer scripts plugin — install one of Insert Headers and Footers (WPCode), Header Footer Code Manager, or any equivalent. Paste the Deskbolt integration script into the plugin's Footer (or "scripts before
</body>") section and save. - Edit your theme directly — paste the snippet into your theme's
footer.phpjust before</body>. We recommend using a child theme so the change survives theme updates.
Webflow
- Open your Webflow project.
- Go to Project Settings → Custom Code.
- Paste the Deskbolt integration script into the Footer Code field.
- Click Save Changes, then Publish your site.
The widget will appear on every page of your published Webflow site. It does not appear in the Designer preview (Webflow strips custom scripts there).
Wix
- Open your Wix Editor.
- Go to Settings → Custom Code (under "Advanced" in some plans).
- Click + Add Custom Code.
- Paste the Deskbolt integration script.
- Choose Add Code to Pages → All Pages, place in Body — End.
- Click Apply, then publish your site.
Custom Code is available on Wix paid plans. The widget will not appear on free Wix sites.
Squarespace
- Open your Squarespace dashboard.
- Go to Settings → Advanced → Code Injection.
- Paste the Deskbolt integration script into the Footer field.
- Save.
Code Injection requires a Business plan or higher.
Shopify
- Open your Shopify admin.
- Go to Online Store → Themes.
- On your active theme, click ... → Edit code.
- Open the file
layout/theme.liquid. - Paste the Deskbolt integration script just before the closing
</body>tag. - Save.
The widget will appear on every storefront page including product, collection, and cart pages.
Framer
- Open your Framer project.
- Go to Site Settings → General → Custom Code → End of
<body>tag. - Paste the Deskbolt integration script.
- Publish.
Google Tag Manager (GTM)
If you already manage your scripts via GTM, you can deploy the Deskbolt widget without touching your site code:
- In GTM, Tags → New → Custom HTML.
- Paste the Deskbolt integration script.
- Set the Trigger to All Pages (or restrict to specific URLs if you only want the widget on some pages).
- Save → Submit → Publish.
Single-page applications (React, Vue, Next.js, Nuxt, Angular, etc.)
Add the script to the HTML shell of your app (typically index.html for React/Vue, _document.tsx/_document.js for Next.js, the nuxt.config.ts head field for Nuxt, etc.) — not inside a component. Single-page apps mount and unmount components on navigation, but the widget should persist across route changes.
For Next.js (pages/_document.tsx):
import { Html, Head, Main, NextScript } from 'next/document';

export default function Document() {
  return (
    <Html>
      <Head />
      <body>
        <Main />
        <NextScript />
        <script
          src="https://www.deskbolt.com/widget.js"
          data-deskbolt-widget-id="YOUR_WIDGET_ID"
        />
      </body>
    </Html>
  );
}
Plain HTML / static sites
Paste the snippet into your global layout / template file just before </body>. If you have no template and your site is a single index.html, paste it there.
iframe / embedded sub-pages
The widget works inside a regular iframe as long as the iframe is on a domain you control (so cross-origin storage works correctly). It is not supported when the iframe runs inside a third-party tool that sandboxes scripts (e.g. some email-newsletter previewers).
5. Verify the integration
- Visit your website in a regular browser (not the CMS preview).
- Wait 2–3 seconds for the page to finish loading.
- You should see the Deskbolt chat button appear in the bottom-right corner. Click it: the AI agent greets you in the language of your browser.
If the widget does not show up, here is the debug checklist in order:
- Open the browser DevTools → Console. Any error mentioning
widget.jsordeskboltis the entry point. - Network tab → search for
widget.js. It should return HTTP 200. If you get 403 or 404, yourdata-deskbolt-widget-idis probably wrong — copy it again from your dashboard. - Ad-blockers and tracking-blockers (uBlock Origin, Brave Shields, Privacy Badger) sometimes block third-party chat widgets by default. Disable the blocker on your site to confirm. Once confirmed, you can ask visitors to whitelist
deskbolt.com, or add an exception rule in the blocker. - Strict Content Security Policy (CSP) — if your site uses CSP headers, you must allow:
script-src https://www.deskbolt.comconnect-src https://www.deskbolt.comframe-src https://www.deskbolt.com(only if you use the widget's full-screen mode on mobile)
- CMS double-encoding. Some site builders escape the
<and>characters when you paste the snippet. Re-paste using your CMS's "Custom HTML" or "Embed" block, not its rich-text editor. - Multiple widgets on the same page. Only one Deskbolt widget per page. If you accidentally pasted the snippet twice, remove the duplicate.
6. Customize the look and behavior
Once the widget is live, all visual and behavioral configuration happens from your dashboard, not in the script tag. You never need to touch the integration code again.
From Settings → Widget, an Admin or Manager can change:
- Colors and branding — primary color, button color, border, text color, channel-specific accent colors.
- Position on the page — bottom-right (default), bottom-left, top-right, top-left.
- Mobile vs desktop appearance — separate styling for the mobile button (avatar / icon, fullscreen / compact display mode, custom margins).
- Languages — the widget UI is available in 13 languages and auto-detects the visitor's browser language. The AI agent itself converses in 159+ languages, also auto-detected.
- Margin rules per URL — push the widget out of the way on specific pages (e.g. above your existing cookie banner, away from a sticky add-to-cart button).
- AI agent assignment — pick which AI agent (with which personality, qualification flow, and tone) handles conversations on this widget.
Changes made in the dashboard apply live to your site — your visitors see the new look on their next page load. There is no rebuild, no cache flush, no redeploy.
FAQ
Does the widget slow down my website?
No. The script is loaded asynchronously (it never blocks page rendering), it is served from a CDN, and it weighs around 488 KB compressed — roughly the size of a single large image on a real estate listing page. We measure widget impact on Core Web Vitals continuously and tune the bundle to stay invisible to your speed score.
Is the widget GDPR-compatible?
Yes. The widget is built with European and US privacy frameworks in mind:
- Granular consent is collected before any conversation starts, through a consent prompt your agency can customize.
- EU GDPR: full DSAR (Data Subject Access Request) support, granular consent log, audit trail, and cascade-delete on request.
- US: California (CCPA / CPRA), Virginia (VCDPA), Colorado (CPA), Connecticut (CTDPA), Utah (UCPA) and the rest of the 50 state frameworks. Visitor jurisdiction is auto-detected from IP geolocation, and the right consent flow is applied without your team having to think about it.
- All sensitive data is encrypted at rest (AES-256-GCM) and in transit (TLS 1.3). Customer data is never sold, transmitted, or shared with third parties.
For your privacy policy / DPA, link to your Data Processing Agreement available at www.deskbolt.com/data-processing-agreement.
Can I run multiple Deskbolt widgets on the same site?
Only one Deskbolt widget per page is supported. If you have separate websites (main agency site + a microsite for a development project, for example), you can run a different widget on each one — see the tip in the Find your Widget ID section above.
How do I temporarily disable the widget?
Two options:
- From your dashboard → Settings → Widget, switch the widget to inactive. The script tag stays on your site but the widget UI no longer renders.
- From your website, remove the
<script>snippet. The widget disappears within seconds for new page loads.
Both are reversible at any time.
What about mobile visitors?
The widget is built mobile-first. On phones, it shows up as a circular button (with your AI agent's avatar) by default, and opens either as a full-screen modal or as a compact sheet at the bottom of the screen — your choice in the dashboard. There is no separate "mobile snippet": the same <script> tag handles both desktop and mobile.
Will the widget appear in CMS preview / staging?
It depends on the CMS:
- Webflow Designer preview: no, custom scripts are stripped.
- WordPress block editor / preview: depends on which preview mode — custom scripts usually run in "Preview in new tab" but not in the inline editor.
- Most other CMS staging environments: yes, as long as you also publish/deploy the staging build.
To preview the widget without publishing, use the Preview Widget button inside the Deskbolt dashboard's Widget settings — that opens your widget on a public preview URL you can share with your team.
Need help?
If you've followed every step above and the widget still does not appear, write to support@deskbolt.com with:
- Your agency name and Widget ID.
- The full URL of the page where the widget should appear.
- A screenshot of the browser DevTools Console (any errors).
We answer integration tickets in priority and we can help your developer or webmaster directly if needed.