# Deskbolt — Full documentation bundle for LLMs > This is the full content of every published page on https://docs.deskbolt.com, > in plain Markdown, separated by clear delimiters. It is the same source the > human-facing site is built from. Designed for LLMs that prefer to ingest > everything in one shot rather than crawl page by page. > > Companion file: https://docs.deskbolt.com/llms.txt (structured index + > About / Capabilities / Use cases / FAQ). > > Generated at build time. Last regeneration is implicit (timestamp not > embedded to keep the bundle deterministic and cache-friendly). --- PAGE START --- URL: https://docs.deskbolt.com/dashboard/team-management Locale: en Section: Dashboard Title: Manage your team — Roles and Permissions in Deskbolt Description: Invite teammates to your Deskbolt real estate agency, assign Admin / Manager / Agent roles, suspend or remove members, and review the permission matrix for each role. # Manage your team Invite teammates to your Deskbolt agency, give them a role (Admin, Manager, or Agent), and adjust their access over time. The Team page lives under **Settings → Team** and is **only accessible to Admins**. This page covers four common workflows: opening the Team page, inviting new teammates, managing existing members, and reading the role permissions reference. --- ## Who can access the Team page? Only users with the **Admin** role can see and use Settings → Team. Managers and Agents will not see this menu entry — and won't be able to access the URL directly either. | Role | Can open Team page? | Can invite / promote / remove? | |---|---|---| | **Admin** | ✅ | ✅ Full control | | **Manager** | ❌ | ❌ | | **Agent** | ❌ | ❌ | :::tip[You're an Admin if…] You are the person who first signed up for your agency on Deskbolt. Each agency has at least one Admin. You can promote a Manager to Admin later — see [Promote a Manager to Admin](#promote-a-manager-to-admin). ::: --- ## Open the Team page 1. Log in to [deskbolt.com](https://www.deskbolt.com) 2. In the left sidebar, expand **Settings**, then click **Team** ![Sidebar with Settings expanded and Team selected](/img/team-management/step-01-team-page-top.png) The Team page is split into three sections, top to bottom: - **Team Members** — everyone currently on the team, grouped by role - **Invite Team Members** — bulk-invite new managers and agents - **Role Permissions** — quick reference of what each role can do --- ## Invite teammates You invite teammates by email. They will receive a sign-up link, and their account is created with the role you assigned. 1. Scroll to **Invite Team Members** 2. Paste **Manager** emails in the first textarea (one per line) 3. Paste **Agent** emails in the second textarea (one per line) 4. Click **Send invitations** (bottom right) ![Invite Team Members card with two textareas and Send invitations button](/img/team-management/step-04-invite-form.png) You can fill **one zone or both**. A single click sends every queued invitation in one action. :::info[One email per line] The textareas accept **one email per line**. Spaces, commas, or semicolons inside a line are treated as a single (invalid) entry. If a line is empty, it's skipped. ::: :::warning[Common validation issues] Before sending, Deskbolt checks each address. You'll get an amber alert if any of the entries is: - **Invalid** — not a valid email format - **Duplicated** in the same zone, or across the two zones - **Already a team member** of your agency - **Already invited** (a pending invite exists) Fix the flagged lines, then click **Send invitations** again. ::: After sending, each invited address receives an email with a personal sign-up link. You can see the queued invites in the **Pending Invitations** card (above the invite form, when at least one is pending). Pending invites display the assigned role and the expiry date — click the cancel button to revoke an invite before it's accepted. --- ## Manage existing members Each row in the **Team Members** card shows the member's name, email, role badge, and current status (Active or Suspended). ![Team Members card grouped by role: Admin, Managers, Agents](/img/team-management/step-02-members-card.png) Three actions are available on the right-hand side of each row, depending on the role: ![Manager row with Promote to admin, Suspend, and Remove buttons](/img/team-management/step-03-member-actions.png) ### Promote a Manager to Admin Click **Promote to admin** on a Manager's row. The Manager becomes an Admin and immediately gains full access to all settings, including the Team page itself. :::tip[Why promote?] Promote when a Manager needs to invite teammates or change permissions on your behalf — for example when you go on vacation or want to share Admin duties. ::: ### Demote an Admin to Manager Click **Demote to manager** on an Admin's row. The Admin becomes a Manager and loses access to Team management and a few Settings pages — but keeps full lead access. :::warning[You can't demote yourself] You cannot demote your own Admin account. If your agency has only one Admin, promote a Manager first, then ask the new Admin to demote you. ::: ### Suspend a member Click **Suspend**. The member is signed out and **cannot log in** until you reactivate them. Their data is preserved (assigned leads, conversations, etc.) — nothing is deleted. :::tip[Suspend vs. Remove] Use **Suspend** for temporary access removal — for example a teammate going on extended leave, or while you investigate a suspicious sign-in. Use **Remove** when the person is leaving the agency for good. ::: To reactivate, click **Reactivate** on the suspended row. ### Remove a member Click **Remove**. The member is **permanently deleted** from your agency. This cannot be undone. :::warning[Remove is irreversible] Lead assignments held by the removed member are released back to the agency pool. Conversations they participated in remain in the team's history, but the member's profile is gone. To regain access for that person later, send them a new invite from scratch. ::: --- ## Role permissions reference The bottom card on the Team page summarizes what each role can do. Use it as a quick reminder when you're unsure which role to assign a new teammate. ![Role Permissions card with three columns: Admin, Manager, Agent](/img/team-management/step-05-role-permissions.png) ### When to use each role - **Admin** — owners, partners, anyone who needs to manage the team or change agency-wide settings - **Manager** — team leads who handle all leads and conversations but don't need to manage teammates or billing - **Agent** — frontline real estate agents, who only see leads assigned to them and focus on lead nurturing You can change a member's role at any time from the Team Members section. --- ## Need help? Email [support@deskbolt.com](mailto:support@deskbolt.com) — include your agency name and a description of what you tried. We usually reply within a few business hours. --- PAGE END --- --- PAGE START --- URL: https://docs.deskbolt.com/integrations/whatsapp/connect-to-deskbolt Locale: en Section: Integrations Title: Connect WhatsApp to Deskbolt — Setup Guide for Real Estate Agencies Description: Step-by-step guide to plug your WhatsApp Business account into Deskbolt via Meta Embedded Signup, so your AI chatbot can qualify real estate leads on WhatsApp 24/7. import LoomVideo from '@site/src/components/LoomVideo'; import HowToJsonLd from '@site/src/components/HowToJsonLd'; # Connect WhatsApp to Deskbolt Once your Meta Business is verified, you can plug WhatsApp into Deskbolt directly from your dashboard. The whole flow is guided — Deskbolt handles the complexity (360dialog as Business Solution Provider, Meta Embedded Signup, number provisioning, display name approval). This page walks you through every screen, in order. {/* TODO Karim: paste your Loom video ID below once recorded */} {/* */} --- ## Prerequisites Before you start, make sure: - ✅ Your Meta Business is **verified** ([check status](./verify-meta-business-status)) - ✅ Your WhatsApp Business Account verification is **active** (same page) - ✅ You have **admin access** to your Meta Business Manager - ✅ You have a **dedicated phone number** for WhatsApp — it cannot be active on the regular WhatsApp consumer app - ✅ Your **Deskbolt account is set up** (we provision it during onboarding) :::warning[Phone number cannot be on regular WhatsApp] The phone number you connect to Deskbolt cannot be in use on the regular WhatsApp app. Either pick a new dedicated number, or delete the existing WhatsApp account on the consumer app first (Settings → Account → Delete) and wait ~10 minutes before retrying. ::: --- ## Connection workflow (overview) ``` 1. Open Deskbolt → Settings → WhatsApp → "Connect WhatsApp Business" ↓ 2. Create a 360dialog account (our WhatsApp BSP partner) ↓ 3. Add your phone number ↓ 4. Answer 3 status questions (No / No / No) ↓ 5. Start the Meta Embedded Signup ↓ 6. Authorize 360dialog on Facebook ↓ 7. Select your Business Portfolio + WhatsApp Business Account ↓ 8. (if creating a new WABA) Enter business info ↓ 9. Add phone number → SMS verification code ↓ 10. Wait ~24h for Meta to approve the display name ↓ Done — your AI chatbot is live on WhatsApp 🎉 ``` The active part takes about **10 minutes**. Then Meta needs **~24h** to approve the display name. Plan accordingly. --- ## Step 1 — Open WhatsApp settings in your Deskbolt dashboard 1. Log in to [deskbolt.com](https://www.deskbolt.com) 2. In the left sidebar: **Settings** → **WhatsApp** 3. Click the green **Connect WhatsApp Business** button ![Deskbolt → Settings → WhatsApp page with Connect WhatsApp Business button](/img/whatsapp-connect/step-01-deskbolt-settings.png) A new browser tab will open to start the connection flow. --- ## Step 2 — Create your 360dialog account Deskbolt uses **360dialog** as official WhatsApp Business Solution Provider (BSP). It's the secure middleman between Meta and Deskbolt — it provisions and manages your WhatsApp number. In the new tab: 1. Enter an **email address** (use a business email — this account is yours) 2. Choose a **password** 3. Click **Continue** ![360dialog Create a new account screen with email and password fields](/img/whatsapp-connect/step-02-360dialog-signup.png) :::tip[Use a real, monitored email] 360dialog will send important notifications to this address (number status, billing if applicable, security alerts). Use an email that's actually monitored — not a temporary one. ::: --- ## Step 3 — Add your phone number After signup, you'll land on the 360dialog dashboard. Click **Add a number** to start adding your WhatsApp number. You'll see the **About your number** screen with one initial dropdown: ![360dialog About your number — first question dropdown](/img/whatsapp-connect/step-03-360dialog-about-number-empty.png) --- ## Step 4 — Answer the 3 status questions As you answer each question, the next one appears. **All three answers must be "No"** for Deskbolt's setup to work: | Question | Answer | |---|---| | Is this number connected to **WhatsApp Business API**? | **No, this number is not connected to WhatsApp Business API** | | Is this number connected to **WhatsApp Business App**? | **No, this number is not connected to WhatsApp Business App** | | Is the number connected to a **personal WhatsApp account**? | **No, this number is not connected to a personal WhatsApp account** | Once all 3 are answered, click **Confirm number details** (bottom right): ![360dialog About your number — 3 questions answered with No, Confirm number details button visible](/img/whatsapp-connect/step-04-360dialog-about-number-answered.png) :::warning[If any answer is "Yes"] If your number is already on the consumer WhatsApp app, the personal app, or another BSP's WhatsApp Business API: you need to remove it from the previous setup first. Contact us — we'll help you handle the migration safely. ::: --- ## Step 5 — Start the Meta Embedded Signup 360dialog now shows you a recap of what's about to happen on Meta's side — 3 sub-steps inside the Embedded Signup: 1. **Access Meta Business Manager** — Meta confirms which BM owns the number 2. **Select a WhatsApp Business Account** — choose existing or create new 3. **Verify your WhatsApp number** — the SMS/voice code Click **Start Embedded Signup** (blue button, bottom right): ![360dialog Embedded signup overview with 3 sub-steps and Start Embedded Signup button](/img/whatsapp-connect/step-05-360dialog-embedded-signup.png) :::info[Important — turn off two-step verification first] If you've previously used another WhatsApp BSP and **two-step verification** is enabled on the WhatsApp account you're migrating, **disable it BEFORE proceeding** (see the warning at the bottom of the screen). You can re-enable it after the migration. ::: --- ## Step 6 — Authorize 360dialog on Facebook A new Facebook Login for Business window opens. You'll see: > **Seamlessly connect your account to 360Dialog** > > This onboarding process will walk you through registering and connecting your business account to your trusted partner. Click **Continue** at the bottom right: ![Facebook Login for Business — Seamlessly connect your account to 360Dialog](/img/whatsapp-connect/step-06-fb-seamlessly-connect.png) --- ## Step 7 — Select your Business Portfolio + WhatsApp Business Account Meta now asks you which assets to share with 360dialog. Two dropdowns to fill: ### Business portfolio Select the Business Manager that owns your WhatsApp number (often called your business name). ### WhatsApp Business account Two options: - **If you already have a WhatsApp Business Account** in this portfolio that you want to use: select it from the list - **If you want a new one dedicated to Deskbolt** (recommended for a clean setup): select **Create a WhatsApp Business account** ![Facebook — Select the business assets to share with 360dialog: Business portfolio + WhatsApp Business account dropdowns](/img/whatsapp-connect/step-07-fb-select-business-assets.png) :::tip[Recommendation : create a dedicated WABA for Deskbolt] Even if you have an existing WhatsApp Business Account, we **recommend creating a new one dedicated to Deskbolt**. This isolates your AI chatbot's number and keeps things clean if you ever want to disconnect it later without affecting other workflows. ::: Click **Next**. --- ## Step 8 — Enter business info (if creating a new WABA) If you chose **"Create a WhatsApp Business account"** at Step 7, you'll need to fill in your business details: | Field | What to enter | |---|---| | **Name** | The display name your customers will see when you message them on WhatsApp. Must match your real brand name (Meta will reject "Test123" or fake names). | | **Category** | Choose the closest category to your business activity (Real estate, Services, etc.) | | **Country** | The country where your business is registered | | **Website** *(optional)* | Your business website URL | | **Time zone** | Your local time zone | ![Facebook — Enter business information for new assets: Name, Category, Country, Website, Time zone fields](/img/whatsapp-connect/step-08-fb-enter-business-info.png) :::warning[Display Name will be reviewed by Meta] Your **display name** (the "Name" field) is the customer-facing name on WhatsApp. Meta reviews every name to make sure it matches your real brand. Pick a name that: - Matches your business name as it appears on your website - Doesn't contain "Test", "Demo", or generic words - Doesn't imply a partnership with WhatsApp/Meta (e.g. "WhatsApp Pro" → rejected) ::: Click **Next** to continue. --- ## Step 9 — Add your phone number and verify the SMS code After business info, Meta asks you to **add the phone number** that will be your WhatsApp Business number: 1. Enter the phone number (with country code, e.g. `+33 6 12 34 56 78`) 2. Choose **SMS** or **Voice call** to receive the verification code 3. The code arrives within seconds — enter the **6-digit code** in the form 4. Click **Validate** :::tip[Voice call if SMS doesn't arrive] Some carriers block automated SMS. If you don't receive the code within 1-2 minutes, retry with the **Voice call** option — Meta will dictate the code over the phone. ::: --- ## Step 10 — Wait ~24h for Meta to approve the display name Once the phone is verified, **Meta reviews your display name** to make sure it matches your brand. This is a **manual review**: - ⏱️ Typical delay: **~24 hours** - ⏱️ Worst case: **a few business days** if Meta needs more info - 📧 You'll receive a Meta email with the result While you wait, your number is **provisioned but not active yet** — the AI chatbot won't reply to messages until the display name is approved. ### When approved ✅ - WhatsApp is fully **functional and active** on your Deskbolt account - The AI chatbot starts handling WhatsApp messages immediately - Send a test message to your business number to confirm it works (the chatbot should reply in seconds) ### When rejected ❌ - Meta will tell you what's wrong (most often: name doesn't match brand, or implies partnership with WhatsApp) - Edit the display name in 360dialog dashboard, resubmit - We can help you choose a name that passes — write us at [support@deskbolt.com](mailto:support@deskbolt.com) --- ## What's next? Once everything is live: - Configure your AI chatbot's persona, tone, and qualification questions in your Deskbolt dashboard - Test with real prospects sending messages to your WhatsApp number - Monitor conversations and lead quality in your Deskbolt dashboard Need a walkthrough? [Email us](mailto:support@deskbolt.com) and we'll book a 30-min call. --- ## Troubleshooting ### "The phone number is already in use" The number is currently active on the regular WhatsApp consumer app. Delete that account first (Settings → Account → Delete my account) BEFORE connecting it to Deskbolt. Wait ~10 minutes after deletion before retrying. ### "Verification code not received" - Check the phone number you entered (with the right country code) - Try the **voice call** option instead of SMS — some carriers block automated SMS - Wait 5 minutes and click **Resend code** - If still nothing, contact us — we can investigate ### "Meta says my business is not verified" Go back to [Page 1 — Check verification status](./verify-meta-business-status) and confirm both verifications show ✅ Verified. If not, complete [Page 2 — Verify your business](./meta-business-verification) first, then come back here. ### "Two-step verification is enabled" error Disable two-step verification on the WhatsApp account you're migrating, complete the connection, then re-enable it from the 360dialog dashboard. ### Display name rejected by Meta Meta rejects names that: - Don't match your real brand (as it appears on your website) - Contain "Test", "Demo", "API", or generic words - Imply a partnership with WhatsApp / Meta / Facebook Edit the display name in 360dialog dashboard with a name that exactly matches your website's branding, then resubmit. ### Other issues Email [support@deskbolt.com](mailto:support@deskbolt.com) with a screenshot of the error — we'll fix it together. --- PAGE END --- --- PAGE START --- URL: https://docs.deskbolt.com/integrations/whatsapp/meta-business-verification Locale: en Section: Integrations Title: How to verify your business on Meta — Real Estate Agency Guide Description: Step-by-step guide to complete Meta business verification (organization + WhatsApp Business account), the prerequisite for connecting an AI chatbot like Deskbolt to your real estate agency's WhatsApp. import HowToJsonLd from '@site/src/components/HowToJsonLd'; # How to verify your business on Meta If your verification status came back as **Not verified** (see [Page 1 — Check verification status](./verify-meta-business-status)), here's how to complete the process. This is a **one-time** procedure. Once done, you won't need to repeat it. :::tip[Approval timeline] Most businesses are approved within **24 hours**. Some take up to **14 business days** if Meta needs to manually review documents. Plan accordingly. ::: --- ## Before you start — Prepare your documents You'll need at least **2 official documents** that prove your business exists and matches the info in your Business Manager. ### Accepted documents (vary by country) | Document type | What it proves | |---|---| | **Business license** / Certificate of incorporation | Legal name + address | | **Tax registration** (VAT, KBIS, etc.) | Legal name + business activity | | **Utility bill** (electricity, water, internet) — under business name | Address | | **Bank statement** under business name (last 3 months) | Legal name + address | | **Articles of incorporation** | Legal name + ownership | :::warning[The match must be EXACT] Your **business name, address, and phone** in your Business Manager must match your documents **character-for-character**. Even a missing comma or a different abbreviation (e.g. "Ltd" vs "Limited") can cause rejection. ::: ### Country-specific requirements Meta's required documents differ by country. Check the [official Meta list](https://www.facebook.com/business/help/159334372093366) to see exactly what works for your country. Common cases: - 🇫🇷 **France** : extrait Kbis (< 3 mois) + facture EDF/Enedis - 🇬🇧 **UK** : Companies House Certificate + utility bill - 🇪🇸 **Spain** : Escritura de Constitución + factura de servicios - 🇵🇹 **Portugal** : Certidão Permanente + fatura de serviços - 🇺🇸 **USA** : Articles of Incorporation + IRS letter (EIN) --- ## Step-by-step verification process ### Step 1 — Make sure your business info is correct Before starting verification, double-check that the info in your Business Manager matches your documents: 1. Go to [business.facebook.com](https://business.facebook.com) 2. **Settings** → **Business portfolio info** 3. Verify each field: - **Legal business name** : exact match with your business license - **Address** : exact match (street name, number, postal code, country) - **Business phone** : a working number Meta can call if needed - **Website** : your business's official website (HTTPS, accessible) Edit anything that doesn't match BEFORE submitting verification. ### Step 2 — Open Security Center 1. **Settings** → **Security Center** (left sidebar) 2. Scroll to **Business Verification** 3. Click **Start verification** (or **Continue verification** if already in progress) ### Step 3 — Confirm your business details Meta will show you the business info pulled from your portfolio. Confirm everything matches your documents exactly. **Do not paraphrase or shorten anything.** If anything is wrong, go back to Step 1 and fix it before continuing. ### Step 4 — Select your business from Meta's list Meta searches their database (Dun & Bradstreet, government registries) for businesses matching your name + address. - If your business appears → select it ✅ - If not → click **"My business is not listed"** and you'll be asked to upload more documents ### Step 5 — Upload your documents Upload **at least 2 documents** from the list above. PDF format works best (PNG/JPG accepted but lower quality often fails). :::tip[Make scans crisp] Use a good scanner or [Adobe Scan](https://acrobat.adobe.com/us/en/mobile/scanner-app.html) on mobile. Blurry/cropped scans are the #1 cause of rejection. ::: ### Step 6 — Choose verification method (Domain, Email, Phone) Meta will ask you to confirm your business by one of: - **Domain verification** : add a TXT record to your DNS — most reliable - **Email verification** : Meta sends a code to an email at your business domain (e.g. `info@yourbusiness.com`) - **Phone verification** : Meta calls your business phone number Domain is the most robust. If you don't have DNS access, email is the easiest fallback. ### Step 7 — Submit and wait Click **Submit**. Meta will review. You'll receive an email + a notification in Business Manager: - ⏱️ **Within 24h** in most cases - ⏱️ **Up to 14 business days** if manual review is required --- ## Common reasons for rejection (and how to fix them) | Rejection reason | Fix | |---|---| | Document name doesn't match Business Manager name | Edit your Business Manager info to match the document EXACTLY (including punctuation) | | Document is too old (>1 year for utility bills, >3 months in some countries) | Upload a more recent document | | Document is unclear / blurry / cropped | Re-scan with better quality (use Adobe Scan or similar) | | Wrong country selected | Update the country in your Business Manager | | Business activity doesn't match document | Make sure the document shows your business is active and registered | | Phone/email verification call missed | Try again — Meta usually allows multiple attempts | If your verification is rejected: 1. Read Meta's email carefully — they tell you exactly what's wrong 2. Fix the issue (update info or upload better documents) 3. Resubmit (you have unlimited attempts) --- ## Once you're verified Both your **business** AND your **WhatsApp Business Account** need to show ✅ Verified. - Business verification ✅ → unlocks WhatsApp account verification (which is usually automatic, but can take a few additional hours) - Once both are ✅ → check the status using [Page 1 — Check verification status](./verify-meta-business-status) - Then move to [Connect WhatsApp to Deskbolt](./connect-to-deskbolt) --- ## Sources - [Verify Your Business in Meta Business Suite — Meta official](https://www.facebook.com/business/help/2058515294227817) - [About Business Verification in Meta Business Suite](https://www.facebook.com/business/help/1095661473946872) - [Upload official documents to verify your business](https://www.facebook.com/business/help/159334372093366) ## Need help? If verification keeps failing or you get stuck on a specific step, write us at [support@deskbolt.com](mailto:support@deskbolt.com) with a screenshot of the error message — we've helped many clients through this. --- PAGE END --- --- PAGE START --- URL: https://docs.deskbolt.com/integrations/whatsapp/verify-meta-business-status Locale: en Section: Integrations Title: Check your Meta Business verification status — Real Estate Agency Guide Description: How to confirm if your business and your WhatsApp Business account are verified in Meta Business Manager — the prerequisite for connecting Deskbolt's AI chatbot to your real estate agency's WhatsApp. import LoomVideo from '@site/src/components/LoomVideo'; # Check your Meta Business verification status Before connecting **WhatsApp** to Deskbolt, your business must be **verified by Meta** — both at the **business** level and the **WhatsApp Business account** level. This page shows you how to check both statuses in 2 minutes. {/* TODO Karim: paste your Loom video ID below once recorded */} {/* */} ## Prerequisites - Admin access to your **Meta Business Manager** ([business.facebook.com](https://business.facebook.com)) - The Business Manager that owns the page/WhatsApp number you want to connect to Deskbolt :::info[Multiple Business Managers?] If your account has several Business Managers, make sure you check the one that **owns the WhatsApp Business Account** you want to use with Deskbolt. Switching BMs is done via the dropdown at the top-left of [business.facebook.com](https://business.facebook.com). ::: --- ## Quick check — Business verification status The fastest way to see if your business is verified: 1. Go to [business.facebook.com](https://business.facebook.com) 2. Click on the **Settings** icon (top-left, gear icon) → **Business portfolio info** 3. Scroll down to **Business verification status** If you see a green ✓ **Verified**, your business is verified. ✅ ![Business portfolio info — Business verification status: Verified](/img/meta-verify/step1.png) If you see something else (Not verified, Failed, Pending), go to [Page 2 — How to verify your business](./meta-business-verification). --- ## Detailed check — Security Center For more detail (and to check **WhatsApp Business Account** verification specifically), use the Security Center: ### Step 1 — Open Security Center In Business Manager: 1. **Settings** → **Security Center** (left sidebar) 2. Scroll to the **Business Verification** section 3. Click the **"Select your verification use case"** dropdown — you'll see 3 options: ![Security Center — Select your verification use case dropdown showing 3 options](/img/meta-verify/step2.png) ### Step 2 — Check WhatsApp Business Account verification Select **"Setting up a WhatsApp Business account"** from the dropdown. If your WhatsApp account is verified, you'll see: > **Verification for [Your Business Name]** > ✅ **Verified** ![Setting up a WhatsApp Business account — Verified status displayed](/img/meta-verify/step3.png) ### Step 3 — Check business / organization verification Switch the dropdown to **"Verifying a business or organization"**. If your business is verified at the org level: > **Verification for [Your Business Name]** > ✅ **Verified** ![Verifying a business or organization — Verified status displayed](/img/meta-verify/step4.png) --- ## What does "Verified" actually mean? You need **both** statuses to be ✅ Verified before Deskbolt can connect WhatsApp: | Verification | Required for | How to check | |---|---|---| | **Business / organization** | All Meta business products (ads, WhatsApp, etc.) | Step 3 above | | **WhatsApp Business account** | Sending messages via WhatsApp API (which Deskbolt uses) | Step 2 above | Both must show ✅ **Verified** with the green checkmark. If just one is missing, WhatsApp messaging won't work. --- ## What if it's not verified? No worries — verification is a one-time process that takes a few hours to a few business days. See **[How to verify your business on Meta](./meta-business-verification)** for the step-by-step guide. Once both statuses are ✅ Verified, you can move on to **[Connect WhatsApp to Deskbolt](./connect-to-deskbolt)**. --- ## Need help? - [support@deskbolt.com](mailto:support@deskbolt.com) — we'll review your Business Manager with you - [Meta's official Business Verification doc](https://www.facebook.com/business/help/2058515294227817) --- PAGE END --- --- PAGE START --- URL: https://docs.deskbolt.com Locale: en Section: Documentation Title: Deskbolt Docs — AI Chatbot for Real Estate Agencies Description: Documentation for Deskbolt, the AI chatbot built for real estate agencies. Qualify leads 24/7 on WhatsApp, sync to your CRM, and let your AI agent handle prospects so your team focuses on closing. import Card from '@site/src/components/Card'; import CardGrid from '@site/src/components/CardGrid';
# Deskbolt Documentation
The AI chatbot that qualifies real estate leads 24/7. Connect WhatsApp in 10 minutes, integrate with your CRM, and let your AI handle prospects while you focus on closing.
## Get started
The fastest path from zero to a live AI chatbot on WhatsApp.
## Who this is for ## Need help?
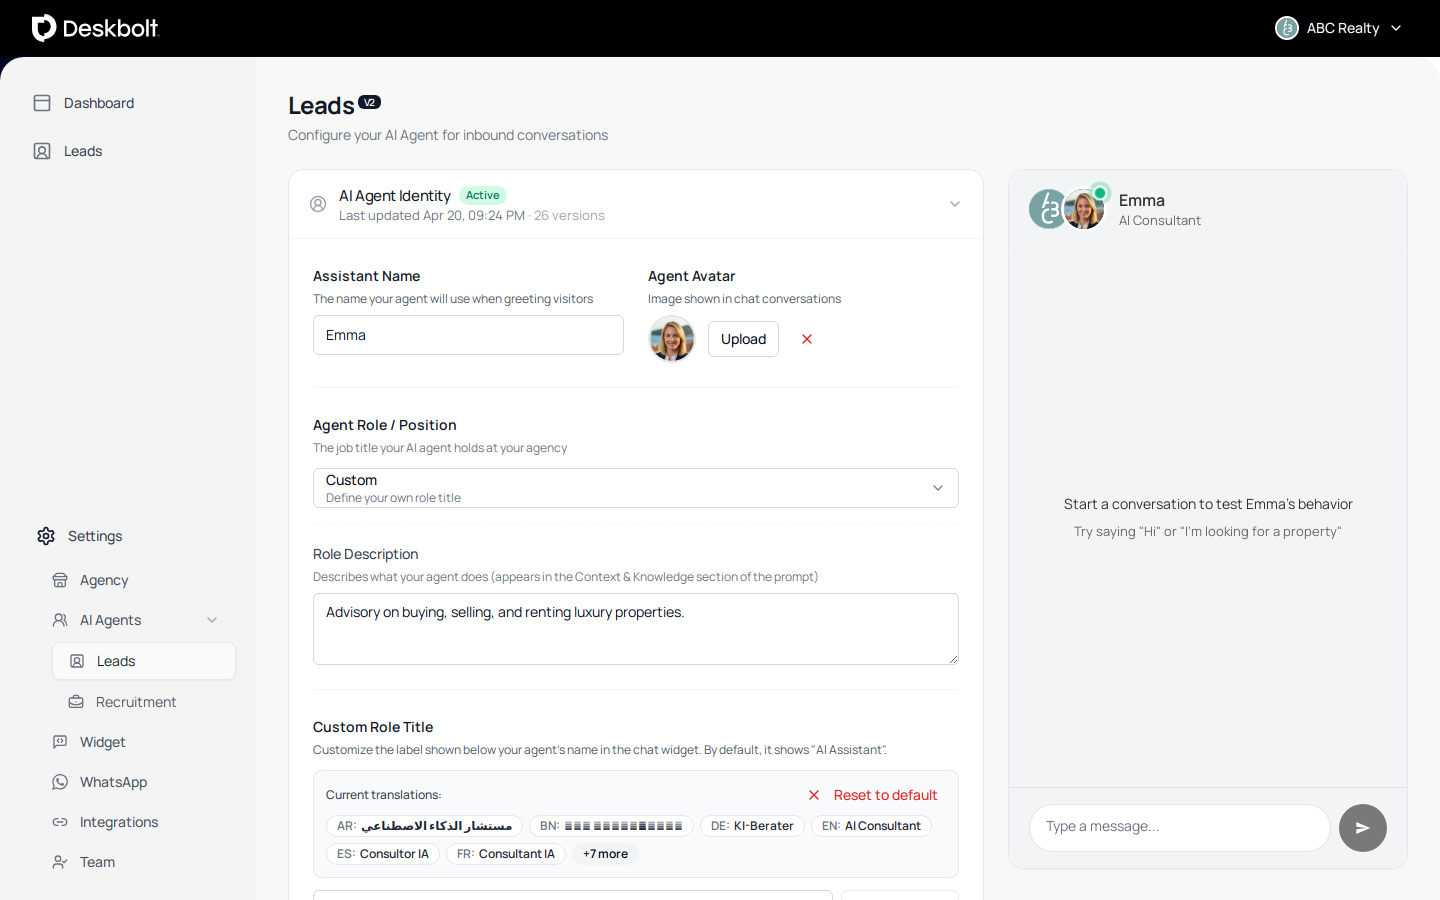
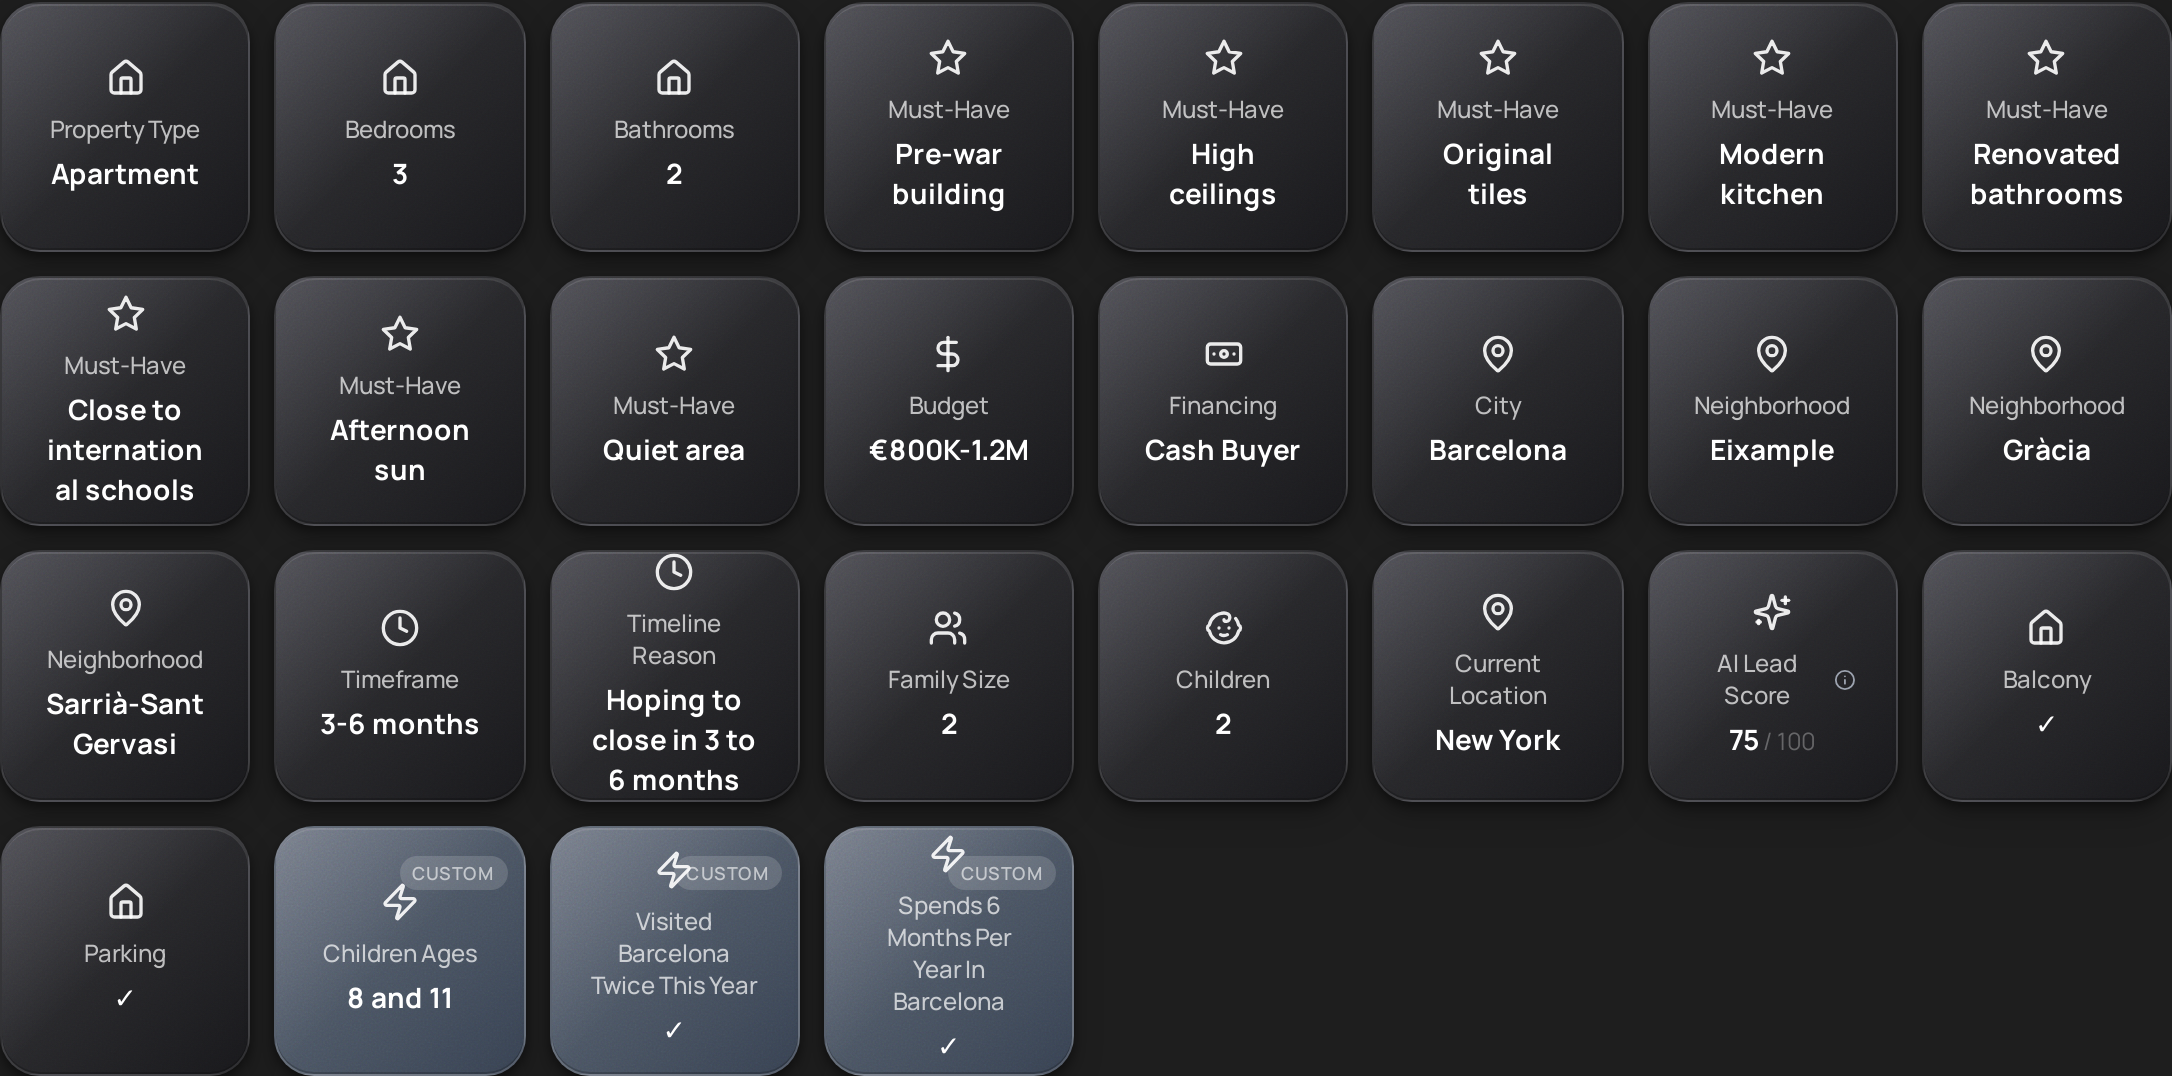
--- PAGE END --- --- PAGE START --- URL: https://docs.deskbolt.com/what-is-deskbolt Locale: en Section: Documentation Title: What is Deskbolt? AI Chatbot for Real Estate Agencies Description: Deskbolt is the AI conversational agent built for real estate agencies. Qualify leads 24/7 in 159+ languages on WhatsApp and livechat, capture rich Smart Data, sync to your CRM in real time, and fully customize your AI agent. # What is Deskbolt? **Deskbolt is the AI conversational agent built specifically for real estate agencies.** It runs 24 hours a day, 7 days a week, on the channels your prospects already use — WhatsApp, the livechat widget on your website, email — qualifying every inbound lead, answering property questions, capturing structured **Smart Data** on each prospect, and pushing the qualified ones straight to your CRM. Where a generic chatbot replies *"thank you for your message"*, Deskbolt has a real conversation: it asks about budget, location, timeline, family situation, financing, must-haves — the same questions an experienced agent would ask — and **structures every detail** the prospect drops along the way. By the time a lead reaches your team's desk, it's not just qualified. It's profiled. --- ## Built by real estate professionals, for real estate professionals Deskbolt is not a generic chatbot platform retrofitted for real estate. **Our team has more than 15 years of hands-on experience in real estate** — both luxury real estate brokerage and general residential — and that domain expertise is what shaped the product. Every qualification flow, every Smart Data field, every CRM integration choice comes from real conversations we've had with real buyers, sellers, and agents over the years. We know which questions actually move a deal forward, which prospect signals correlate with a closed sale, and which kinds of leads waste an agent's afternoon. When you sign up, you don't get a blank chatbot you have to teach. You get an AI agent that already knows what to ask, in what order, and how to read between the lines. --- ## Why real estate agencies need an AI chatbot in 2026 Real estate is a high-volume, latency-sensitive business. A prospect who fills out a form at 11 PM and gets a reply at 9 AM the next day has already messaged three other agencies. Studies consistently show that **the agency that responds first wins the lead** — which makes 24/7 instant response no longer optional. Hiring round-the-clock human SDRs to qualify leads is rarely realistic for an agency that signs 100 to 1,000 mandates per year. **An AI conversational agent solves this exact problem**: instant reply, consistent qualification, and zero leads dropped overnight, on weekends, or during holidays. --- ## An AI agent that's truly yours, not someone else's The agent your prospects talk to is **not "Deskbolt's bot wearing your colors."** It's your agent — your name, your photo, your tone of voice, your own conversational style. Each agency configures their AI agent end-to-end: - A custom **name** ("Emma", "Lucas", "Sofia", whatever fits your brand) — the agent introduces itself by that name on every channel - A custom **avatar / photo** — the prospect sees a real person, not a generic chatbot icon - A custom **role title** that adapts to the visitor's language (AI Consultant in English, Conseiller IA in French, مستشار الذكاء الاصطناعي in Arabic, ...) - A custom **personality and tone** — warm and conversational, formal and concise, energetic, ... - A custom **qualification flow per lead type** — buyer, seller, renter, landlord — with the order of questions, the level of strictness, and the branching logic you want - Custom **do / don't rules** — what the agent must mention, what it must never say ![Deskbolt AI Agent customization screen — name, avatar, role, multi-language titles](/img/what-is-deskbolt/agent-customization.png) This level of control is enabled by **a proprietary technology we developed in-house that gives us exceptional conversation quality and complete control over how the agent responds**. The result: no off-topic drift, no fabricated listings, no advice the agent shouldn't give. Just clean, on-brand conversations that consistently move qualified leads to your team. --- ## Speaks 159+ languages The widget interface is fully translated into **13 languages** today. The AI agent itself can hold a real conversation in **159+ languages**, automatically detected from the visitor's browser. A second-home buyer from Stockholm landing on a French agency's website starts chatting in Swedish — without anyone touching a setting. A Mandarin-speaking investor from Singapore gets full property details in Mandarin. An Arabic-speaking buyer from Dubai converses in Arabic. The agent answers in the prospect's language and the lead arrives in your dashboard with everything readable in your team's working language. --- ## Smart Data — far beyond name, email, phone Most chatbots ask three questions, store three fields, and call it a day. **Deskbolt listens to the entire conversation and structures everything the prospect mentions, even in passing.** Below is a real lead from a single conversation — a New York buyer looking for an apartment in Barcelona. From eight messages of free-form chat, Deskbolt extracted and structured **dozens of data points** automatically: ![Smart Data cards extracted from a single conversation — apartment, 3 bedrooms, 2 bathrooms, 8 must-haves (pre-war building, original tiles, modern kitchen…), budget €800K-1.2M cash buyer, Barcelona neighborhoods Eixample / Gràcia / Sarrià-Sant Gervasi, current location New York, family size 2 with 2 children aged 8 and 11, AI lead score 75/100](/img/what-is-deskbolt/lead-smart-data-cards.png) In a single conversation, Deskbolt captures and structures fields including: - **Financial**: budget range (min / max), currency, financing situation (cash buyer / mortgage pre-approved / in process), down-payment amount - **Location**: preferred cities, neighborhoods, regions, max commute distance, school district preferences, walkability - **Timeline**: timeframe (ASAP / 1 month / 3-6 months / etc.), specific move dates, reason for the timeline, urgency, school year timing - **Property requirements**: bedrooms, bathrooms, surface area, must-have features (parking, balcony, pre-war character, modern kitchen, ...), property types, condition preferences - **Personal situation**: number of adults, children count and ages, pets, employment status, life stage (first-time buyer, upsizing, downsizing, relocating, retirement, investment), current city and country - **Custom extracted data**: anything the AI picks up that's specific to the prospect ("visited Barcelona twice this year", "spends 6 months a year here", "needs to be close to international schools") Every field is structured, queryable, and synced to your CRM. The Smart Data extractor also **re-reads inactive conversations every two minutes** to update fields the prospect mentions later — so a lead's profile keeps getting richer until the agent picks up the phone. --- ## Channels Deskbolt covers | Channel | What it does | |---|---| | **WhatsApp Business** | Inbound + outbound, via official Meta-approved Business Solution Provider. Re-engages cold conversations inside the 24-hour Meta window. | | **Livechat widget** | Embedded on your agency's website. Shadow DOM isolation, mobile-first, customizable to match your brand. | | **Email** | Outbound notifications via SendGrid (lead alerts, password resets, follow-ups). | All three channels feed the same conversation timeline — one prospect, one history, regardless of how they reached you. ### A widget designed for mobile Most real estate leads come in from mobile devices. Deskbolt's livechat widget is built mobile-first with **two display modes**: - **Full-screen mode** — immersive modal that fills the viewport, keeps the prospect focused on the conversation. Ideal for fast qualification. - **Compact mode** — a floating window docked at the bottom of the screen, lets the prospect keep browsing your listings while the conversation continues in parallel. Ideal for property search journeys.
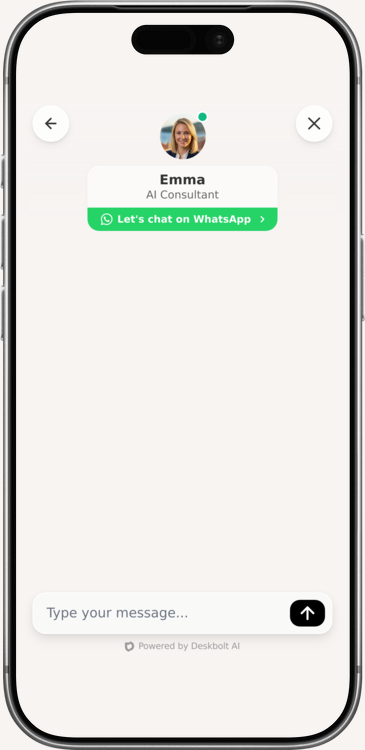
Deskbolt livechat widget on an iPhone — Emma the AI agent with avatar, multi-channel CTAs, message input
The widget is fully customizable per agency: launcher position, button colors, custom welcome messages in 13 languages, mobile button appearance (icon or avatar), custom call-to-action buttons, and per-URL margin rules so the widget plays nicely with the layouts of different sections of your site. ![Deskbolt widget on a real estate agency website — embedded floating bubble](/img/what-is-deskbolt/widget-desktop-open.png) --- ## Real-time CRM sync Deskbolt pushes qualified leads to your CRM the moment they cross the qualification gate, and keeps the data in sync afterwards (status changes, agent assignments, conversation history). Native integrations include: - **HubSpot** (OAuth) - **FollowUpBoss** - **Apimo** - **RealGeeks** - **LionDesk** (OAuth) - **Cloze** - **MaxWork** (RE/MAX Portugal & Spain) - **HMAC-signed outbound webhook** for any custom CRM or internal system Sync is **bidirectional**: changes you make in your CRM (status, assigned agent, notes) flow back to Deskbolt so your team always sees the same picture, regardless of which tool they're working in. --- ## Built for trust — security and compliance Real estate is a high-stakes business. Your prospects' financial details, your transaction history, your client database — all of it has to be handled with bank-grade care. ### Encryption everywhere - **Data at rest**: AES-256-GCM encryption on all sensitive credentials — CRM API keys, OAuth tokens, webhook secrets, integration credentials - **Data in transit**: TLS 1.3 on every endpoint, HSTS-enforced across the platform - **Access control**: role-based authorization at every layer of the stack (Admin, Manager, Agent), with full audit logging ### A dedicated security team Deskbolt has a **dedicated security team** that monitors infrastructure, audits access logs, and reviews every code change for security implications before it ships. Your data is treated as highly sensitive by default — not as marketing material we'll do something with later. ### Your data is yours, period We **never sell, transmit, or share your customer data** with any third party. No data brokers, no marketing partners, no resale to model training pipelines. Your leads, your conversations, your prospects — they live in your Deskbolt workspace and your CRM, and that's where they stay. ### Compliance, in every jurisdiction you operate - **European Union — GDPR**: full compliance, with granular consent logging, full audit trail, IP-based jurisdiction detection, AES-256-GCM encryption of integration tokens, and one-click DSAR cascade delete that removes a prospect's data from leads, conversations, and analytics in one shot. - **United States — all 50 states**: compliant with the California Privacy Rights Act (CPRA / CCPA) and every other state privacy framework currently in force — Virginia (VCDPA), Colorado (CPA), Connecticut (CTDPA), Utah (UCPA), Texas, Oregon, Montana, and the rest. Visitor jurisdiction is detected automatically from IP geolocation, and the right consent flow is applied without your team having to think about it. --- ## Use cases Real-world scenarios Deskbolt is built for: 1. **Independent agency, 200 leads/month, WhatsApp-heavy market** (Spain, Portugal, Brazil, the Middle East) — Deskbolt qualifies every WhatsApp inquiry, hands the qualified ones to the agent on duty, drops the unqualified into a "to nurture" CRM bucket. Volume goes from "we lose half on weekends" to "we follow up on every single one within 2 seconds." 2. **Multi-language second-home market** — French agency selling in Provence to British, Belgian, Dutch, Scandinavian buyers; Spanish agency working German and Nordic buyers in Mallorca; Portuguese agency working Americans in Lisbon. Deskbolt converses in each prospect's native language automatically, qualifies them, and the agent gets a translated summary regardless of which language the conversation actually happened in. 3. **Cross-border luxury buyers** — high-net-worth flows from New York to Barcelona, London to Marrakech, Dubai to Madrid. The example earlier in this page (James Carter, NYC → Barcelona) is exactly this scenario. IP geolocation handles the consent flow, the agent handles the language, the Smart Data extractor handles the profile. 4. **High-volume listing portal feeding the agency** — Deskbolt sits in front of inbound leads from Idealista, Immoweb, SeLoger, Bien'ici, and similar portals. It qualifies on the spot and only pushes the meaningful prospects into the CRM. No more agent burnout from clicking through 200 unqualified portal leads per day. 5. **Agency hiring a "virtual SDR" instead of a human SDR** — for agencies signing 100 to 1,000 mandates per year, hiring round-the-clock human SDRs is rarely realistic. Deskbolt is the SDR — instant reply, consistent qualification, never quits, never sleeps. --- ## Get started If you want to set up Deskbolt for your agency, the fastest path is the WhatsApp connection flow: 1. **[Check your Meta Business verification](/integrations/whatsapp/verify-meta-business-status)** — confirm your business is allowed to run WhatsApp Business API 2. **[Verify your business on Meta](/integrations/whatsapp/meta-business-verification)** — if you're not yet verified 3. **[Connect WhatsApp to Deskbolt](/integrations/whatsapp/connect-to-deskbolt)** — the 10-minute connection flow Once WhatsApp is live, you can **[invite your team](/dashboard/team-management)** with the right permissions (Admin / Manager / Agent), and the AI agent starts handling leads immediately. --- ## Need to talk to a human? For pricing, custom CRM integrations, security questionnaires, or to book a demo, contact us at **[support@deskbolt.com](mailto:support@deskbolt.com)** or visit **[deskbolt.com](https://www.deskbolt.com)**. --- PAGE END --- --- PAGE START --- URL: https://docs.deskbolt.com/widget/integration Locale: en Section: Widget Title: Install the Deskbolt widget on your website Description: Step-by-step guide to embed the Deskbolt AI chat widget on your real estate agency website — find your Widget ID, copy the integration script, place it on HTML, WordPress, Webflow, Wix, Squarespace, Shopify, Framer, Google Tag Manager and single-page apps. Includes verification, FAQ, and troubleshooting. This page is the integration checklist for the **Deskbolt AI chat widget**. Anyone — your in-house dev, a freelance webmaster, or you with a copy/paste — can have the widget live on your website in **under five minutes**. No code review, no DNS change, no hosting setup. The widget is a single ` ``` Where `YOUR_WIDGET_ID` is replaced with the value generated for your agency. Keep this snippet exactly as is — it is safe to expose publicly. The Widget ID is **not a secret**; it identifies your agency the way a Google Analytics tracking ID does. :::info[Simpler alternative] If your CMS only accepts a plain ` ``` Both forms are equivalent. The longer copy/paste from the dashboard is just defensive — it works even when CMS's strip out scripts that aren't wrapped in a function. ::: ## 3. Place the script on your website The recommended location is **just before the closing `` tag**. That way the widget loads asynchronously after the rest of your page, with zero impact on how fast your site appears for visitors. ```html ``` Placing it in `` also works, but is not recommended — the script then loads earlier and can slightly slow down the first paint of the page on slow connections. The widget snippet works on **every page** of your site. Add it once to your global template (header/footer file, layout component, theme include, GTM container, etc.) and the widget will appear site-wide. ## 4. Platform-specific guides ### WordPress The recommended way to install the widget on WordPress is the **official Deskbolt plugin**. No code, no theme edit, no third-party plugin to keep up to date. #### Option 1 — Official Deskbolt plugin (recommended) 1. In your Deskbolt dashboard, go to **Settings → Widget** and scroll down to the **WordPress Integration** card. 2. Click **Download Plugin (ZIP)**. You will receive a small `.zip` file. 3. In your WordPress admin, go to **Plugins → Add New → Upload Plugin**. 4. Choose the ZIP you just downloaded and click **Install Now**, then **Activate Plugin**. 5. The plugin now appears in your installed plugins list: ![Deskbolt Chat Widget plugin in the WordPress Plugins list](/img/widget/wordpress-01-plugin-list.png) 6. In the WordPress sidebar, go to **Settings → Deskbolt Widget**: ![Deskbolt Widget settings page in WordPress admin](/img/widget/wordpress-02-plugin-settings.png) 7. Paste your **Agency ID** (it's the same value as the Widget ID — copy it from your Deskbolt dashboard, **Settings → Widget → Website Integration**). 8. Make sure **Enable Widget** is checked, then click **Save Settings**. The status badge at the top should switch to **Active and Running**, and the widget will appear on every page of your WordPress site within seconds. The optional **Show in Admin Area** toggle is useful if you want to test the widget directly from the WordPress admin without leaving the dashboard. The plugin is signed and maintained by Deskbolt, follows WordPress security best practices, and updates from your dashboard whenever we ship a new version. #### Option 2 — Manual install (no Deskbolt plugin) If you prefer not to add a plugin, you have two manual paths: - **Header & footer scripts plugin** — install one of *Insert Headers and Footers* (WPCode), *Header Footer Code Manager*, or any equivalent. Paste the Deskbolt integration script into the plugin's **Footer** (or "scripts before ``") section and save. - **Edit your theme directly** — paste the snippet into your theme's `footer.php` just before ``. We recommend using a [child theme](https://developer.wordpress.org/themes/advanced-topics/child-themes/) so the change survives theme updates. ### Webflow 1. Open your Webflow project. 2. Go to **Project Settings → Custom Code**. 3. Paste the Deskbolt integration script into the **Footer Code** field. 4. Click **Save Changes**, then **Publish** your site. The widget will appear on every page of your published Webflow site. It does **not** appear in the Designer preview (Webflow strips custom scripts there). ### Wix 1. Open your Wix Editor. 2. Go to **Settings → Custom Code** (under "Advanced" in some plans). 3. Click **+ Add Custom Code**. 4. Paste the Deskbolt integration script. 5. Choose **Add Code to Pages → All Pages**, place in **Body — End**. 6. Click **Apply**, then publish your site. Custom Code is available on Wix paid plans. The widget will not appear on free Wix sites. ### Squarespace 1. Open your Squarespace dashboard. 2. Go to **Settings → Advanced → Code Injection**. 3. Paste the Deskbolt integration script into the **Footer** field. 4. Save. Code Injection requires a Business plan or higher. ### Shopify 1. Open your Shopify admin. 2. Go to **Online Store → Themes**. 3. On your active theme, click **... → Edit code**. 4. Open the file `layout/theme.liquid`. 5. Paste the Deskbolt integration script just before the closing `` tag. 6. Save. The widget will appear on every storefront page including product, collection, and cart pages. ### Framer 1. Open your Framer project. 2. Go to **Site Settings → General → Custom Code → End of `` tag**. 3. Paste the Deskbolt integration script. 4. Publish. ### Google Tag Manager (GTM) If you already manage your scripts via GTM, you can deploy the Deskbolt widget without touching your site code: 1. In GTM, **Tags → New → Custom HTML**. 2. Paste the Deskbolt integration script. 3. Set the **Trigger** to *All Pages* (or restrict to specific URLs if you only want the widget on some pages). 4. **Save → Submit → Publish**. ### Single-page applications (React, Vue, Next.js, Nuxt, Angular, etc.) Add the script to the **HTML shell** of your app (typically `index.html` for React/Vue, `_document.tsx`/`_document.js` for Next.js, the `nuxt.config.ts` `head` field for Nuxt, etc.) — **not** inside a component. Single-page apps mount and unmount components on navigation, but the widget should persist across route changes. For Next.js (`pages/_document.tsx`): ```tsx import { Html, Head, Main, NextScript } from 'next/document'; export default function Document() { return (
``` Où `YOUR_WIDGET_ID` est remplacé par la valeur générée pour votre agence. Gardez ce snippet exactement tel quel — il est sûr de l'exposer publiquement. Le Widget ID **n'est pas un secret** ; il identifie votre agence comme un identifiant Google Analytics identifie un site. :::info[Forme alternative plus simple] Si votre CMS n'accepte qu'une balise ` ``` Les deux formes sont équivalentes. Le copier-coller plus long fourni par le dashboard est juste une mesure défensive — il fonctionne même quand le CMS retire les scripts qui ne sont pas enveloppés dans une fonction. ::: ## 3. Placer le script sur votre site L'emplacement recommandé est **juste avant la balise fermante ``**. De cette manière le widget se charge de façon asynchrone après le reste de votre page, sans aucun impact sur le temps d'affichage perçu par vos visiteurs. ```html ``` Placer le script dans `` fonctionne aussi, mais ce n'est pas recommandé — il se charge alors plus tôt et peut légèrement ralentir le premier affichage de la page sur connexion lente. Le snippet du widget fonctionne sur **toutes les pages** de votre site. Ajoutez-le une seule fois dans votre template global (fichier header/footer, layout component, theme include, container GTM, etc.) et le widget apparaîtra sur l'ensemble du site. ## 4. Guides par plateforme ### WordPress La méthode recommandée pour installer le widget sur WordPress est le **plugin officiel Deskbolt**. Pas de code, pas d'édition de thème, pas de plugin tiers à maintenir. #### Option 1 — Plugin officiel Deskbolt (recommandé) 1. Dans votre dashboard Deskbolt, allez dans **Settings → Widget** et faites défiler jusqu'à la carte **WordPress Integration**. 2. Cliquez sur **Download Plugin (ZIP)**. Vous récupérez un petit fichier `.zip`. 3. Dans votre admin WordPress, allez dans **Plugins → Add New → Upload Plugin**. 4. Choisissez le ZIP que vous venez de télécharger et cliquez sur **Install Now**, puis **Activate Plugin**. 5. Le plugin apparaît maintenant dans votre liste de plugins installés : ![Plugin Deskbolt Chat Widget dans la liste des plugins WordPress](/img/widget/wordpress-01-plugin-list.png) 6. Dans la sidebar WordPress, allez dans **Settings → Deskbolt Widget** : ![Page de réglages Deskbolt Widget dans l'admin WordPress](/img/widget/wordpress-02-plugin-settings.png) 7. Collez votre **Agency ID** (c'est la même valeur que le Widget ID — copiez-la depuis votre dashboard Deskbolt, **Settings → Widget → Website Integration**). 8. Vérifiez que **Enable Widget** est coché, puis cliquez sur **Save Settings**. Le badge de statut en haut doit basculer sur **Active and Running**, et le widget apparaîtra sur toutes les pages de votre site WordPress en quelques secondes. L'option **Show in Admin Area** est utile si vous voulez tester le widget directement depuis l'admin WordPress sans quitter le dashboard. Le plugin est signé et maintenu par Deskbolt, suit les bonnes pratiques de sécurité WordPress, et se met à jour depuis votre dashboard à chaque nouvelle version. #### Option 2 — Installation manuelle (sans plugin Deskbolt) Si vous préférez ne pas ajouter de plugin, vous avez deux chemins manuels : - **Plugin de scripts header/footer** — installez l'un de *Insert Headers and Footers* (WPCode), *Header Footer Code Manager*, ou un équivalent. Collez le script d'intégration Deskbolt dans la section **Footer** (ou "scripts before ``") du plugin et sauvegardez. - **Modifier votre thème directement** — collez le snippet dans le `footer.php` de votre thème, juste avant ``. Nous recommandons d'utiliser un [thème enfant](https://developer.wordpress.org/themes/advanced-topics/child-themes/) pour que la modification survive aux mises à jour du thème. ### Webflow 1. Ouvrez votre projet Webflow. 2. Allez dans **Project Settings → Custom Code**. 3. Collez le script d'intégration Deskbolt dans le champ **Footer Code**. 4. Cliquez sur **Save Changes**, puis **Publish** votre site. Le widget apparaîtra sur toutes les pages de votre site Webflow publié. Il **n'apparaît pas** dans la preview du Designer (Webflow retire les scripts personnalisés à cet endroit). ### Wix 1. Ouvrez votre Wix Editor. 2. Allez dans **Settings → Custom Code** (sous "Advanced" sur certains plans). 3. Cliquez sur **+ Add Custom Code**. 4. Collez le script d'intégration Deskbolt. 5. Choisissez **Add Code to Pages → All Pages**, placez en **Body — End**. 6. Cliquez sur **Apply**, puis publiez votre site. Custom Code est disponible sur les plans Wix payants. Le widget n'apparaîtra pas sur les sites Wix gratuits. ### Squarespace 1. Ouvrez votre dashboard Squarespace. 2. Allez dans **Settings → Advanced → Code Injection**. 3. Collez le script d'intégration Deskbolt dans le champ **Footer**. 4. Sauvegardez. Code Injection nécessite un plan Business ou supérieur. ### Shopify 1. Ouvrez votre admin Shopify. 2. Allez dans **Online Store → Themes**. 3. Sur votre thème actif, cliquez sur **... → Edit code**. 4. Ouvrez le fichier `layout/theme.liquid`. 5. Collez le script d'intégration Deskbolt juste avant la balise fermante ``. 6. Sauvegardez. Le widget apparaîtra sur toutes les pages de la boutique, y compris produit, collection et panier. ### Framer 1. Ouvrez votre projet Framer. 2. Allez dans **Site Settings → General → Custom Code → End of `` tag**. 3. Collez le script d'intégration Deskbolt. 4. Publiez. ### Google Tag Manager (GTM) Si vous gérez déjà vos scripts via GTM, vous pouvez déployer le widget Deskbolt sans toucher au code de votre site : 1. Dans GTM, **Tags → New → Custom HTML**. 2. Collez le script d'intégration Deskbolt. 3. Définissez le **Trigger** sur *All Pages* (ou restreignez à des URLs spécifiques si vous ne voulez le widget que sur certaines pages). 4. **Save → Submit → Publish**. ### Applications single-page (React, Vue, Next.js, Nuxt, Angular, etc.) Ajoutez le script dans le **HTML shell** de votre app (typiquement `index.html` pour React/Vue, `_document.tsx`/`_document.js` pour Next.js, le champ `head` de `nuxt.config.ts` pour Nuxt, etc.) — **pas** à l'intérieur d'un composant. Les applications single-page montent et démontent les composants à chaque navigation, mais le widget doit persister à travers les changements de route. Pour Next.js (`pages/_document.tsx`) : ```tsx import { Html, Head, Main, NextScript } from 'next/document'; export default function Document() { return (